Image processing basics in the browser
- Published
- Last updated
- Revisions
Image processing includes everything from basic image editing, like cropping and resizing images, to various computer graphics and vision tasks. In this article we'll look into the relevant browser APIs used to load images, manipulate pixel data and display the results.
Loading images
Browser can download and display images in different formats with ease but accessing the pixel data requires jumping through hoops. Here are two ways of loading images and reading their pixel data.
From URL
In order to load an image from URL, we need to do the following steps:
- Load the image using
Imageobject (equivalent to callingdocument.createElement('img')or writing<img>in HTML) - After
onloadevent fires, draw the image on a canvas usingdrawImage - Read the pixel data from the canvas using
getImageData
Let's wrap all these steps in a nice function that returns a Promise:
function loadImageFromUrl(url) {
  return new Promise((resolve, reject) => {
    const img = new Image();
    img.onload = () => {
      const canvas = document.createElement('canvas');
      canvas.width = img.width;
      canvas.height = img.height;
      const ctx = canvas.getContext('2d');
      ctx.drawImage(img, 0, 0, canvas.width, canvas.height);
      resolve(ctx.getImageData(0, 0, canvas.width, canvas.height));
    };
    img.onerror = () => {
      reject('failed to load image');
    };
    img.src = url;
  });
}
loadImageFromUrl('example.jpg')
  .then(image => console.log(`loaded ${image.width}x${image.height} image`));
Accessing pixel data of images from remote URLs is not allowed for security and privacy reasons.
To work around this, either serve the images from the same origin as your website, or configure CORS headers for the remote URL and specify crossOrigin attribute in loadImageFromUrl function:
img.crossOrigin = 'anonymous';
From file system
It's also possible read an image from the user's device.
To do this, we use FileReader to a read the user-provided file and convert it to a data URL.
Then we can use the loadImageFromUrl function to read the pixel data.
function loadImageFromFile(file) {
  return new Promise((resolve, reject) => {
    const reader = new FileReader();
    reader.onload = event => resolve(reader.result);
    reader.onerror = event => reject('failed to load file');
    reader.readAsDataURL(file);
  }).then(loadImageFromUrl);
}
To get a file from the user, we can use the following input element:
<input type="file" accept="image/*" id="input">
and handle its change event:
const input = document.getElementById('input');
input.addEventListener('change', () => {
  loadImageFromFile(input.files[0])
    .then(image => console.log(`loaded ${image.width}x${image.height} image`));
});
There are some other ways of getting images from users like drag and drop and web cameras. Read more about these on Capturing an Image from the User from Web Fundamentals.
Downsampling
The image resolution can be high especially when coming from the user. This can make the processing very slow and memory intensive. Instead, we may want to do our processing on a downsampled image i.e. a smaller version of the original image.
We can use drawImage to resize the image.
For example, we could create a 200 pixels wide image with the original aspect ratio by modifying the loadImageFromUrl function:
canvas.width = 200;
canvas.height = 200 * (img.height / img.width);
ctx.drawImage(img, 0, 0, canvas.width, canvas.height);
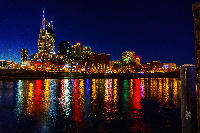
Unfortunately, the quality of downsampling high-resolution images in Firefox is poor compared to Chromium (see Firefox bugs 1228847 and 1505383). For example, here's a photograph resized from 6000 × 4000 pixels down to 200 × 133 pixels:

Furthermore, the canvas specification doesn't define precisely which sampling method should be used for resizing images. For a deterministic cross-browser result you need to implement your own downsampling or use an existing library.
Handling pixel data
After loading an image, we can inspect and modify its pixel data.
The previous functions return ImageData object with width and height properties specifying the image dimensions and data property pointing to the pixel data.
Each pixel consists of four 8-bit integers (0-255) for red, green, blue and alpha channels.
The pixels are stored in a continuous array pixel after pixel and row after row.
For example, the following 2 × 2 image:
is stored in an array of 16 integers:
| Pixel | ||||||||||||||||
|---|---|---|---|---|---|---|---|---|---|---|---|---|---|---|---|---|
| Channel | R | G | B | A | R | G | B | A | R | G | B | A | R | G | B | A |
| Data | 255 | 0 | 0 | 255 | 0 | 255 | 0 | 255 | 0 | 0 | 255 | 255 | 255 | 255 | 0 | 255 |
| Index | 0 | 1 | 2 | 3 | 4 | 5 | 6 | 7 | 8 | 9 | 10 | 11 | 12 | 13 | 14 | 15 |
Commonly we want to loop over all the pixels reading and possibly modifying their values:
for (let i = 0; i < image.data.length; i += 4) {
  const r = image.data[i + 0];
  const g = image.data[i + 1];
  const b = image.data[i + 2];
  const a = image.data[i + 3];
}
In many cases we need x and y positions of the pixel, for instance, to read the surrounding pixels:
for (let y = 0; y < image.height; y++) {
  for (let x = 0; x < image.width; x++) {
    const r = image.data[4 * (y * image.width + x) + 0];
    const g = image.data[4 * (y * image.width + x) + 1];
    const b = image.data[4 * (y * image.width + x) + 2];
    const a = image.data[4 * (y * image.width + x) + 3];
  }
}
Color spaces
Color spaces is a broad topic, so we won't dive deep here. What you need to know is that canvas, like color on the web in general, uses sRGB color space. It's often overlooked that color values in sRGB are not linear. This basically means that the values are stored in way they're perceived by humans instead of what the color intensity actual is.
In order to do image processing properly, we must do gamma correction:
- Convert the non-linear values to linear values (gamma expansion)
- Do our processing on the linear values
- Convert the linear values back to non-linear values (gamma compression)
Doing processing incorrectly on non-linear values can cause subtle problems. To illustrate this, let's apply a blur filter on linear and non-linear values. As expected, both results look blurry, but the non-linear one is darker and the edges are less defined.


We can convert pixel data to linear values with the following function. Note that the resulting values are not integers between 0 and 255 but floating-point numbers between 0 and 1.
function srgbToLinear(image) {
  const data = new Float32Array(4 * image.width * image.height);
  for (let i = 0; i < data.length; i += 4) {
    // Transform red, green and blue channels
    for (let c = 0; c < 3; c++) {
      const u = image.data[i + c] / 255;
      data[i + c] = u <= 0.04045 ? u / 12.92 : ((u + 0.055) / 1.055) ** 2.4;
    }
    // Alpha channel is already linear
    data[i + 3] = image.data[i + 3] / 255;
  }
  return {
    width: image.width,
    height: image.height,
    data
  };
}
Here's the inverse function to get back non-linear values:
function linearToSrgb(image) {
  const output = new ImageData(image.width, image.height);
  for (let i = 0; i < output.data.length; i += 4) {
    // Transform red, green and blue channels
    for (let c = 0; c < 3; c++) {
      let y = image.data[i + c];
      y = y <= 0.0031308 ? y * 12.92 : 1.055 * y ** (1.0 / 2.4) - 0.055;
      output.data[i + c] = 255 * y;
    }
    // Alpha channel is already linear
    output.data[i + 3] = 255 * image.data[i + 3];
  }
  return output;
}
These formulas and background information can be found on Wikipedia's sRGB article.
Exporting images
After doing some processing we need to show the result to the user or store the image somehow.
The simplest way of displaying the image is drawing it on a canvas with putImageData function:
const canvas = document.createElement('canvas');
canvas.width = image.width;
canvas.height = image.height;
const ctx = canvas.getContext('2d');
ctx.putImageData(image, 0, 0);
document.body.appendChild(canvas);
Sometimes we need an image file like PNG or JPEG.
We can create these files from the canvas by calling toDataURL.
The returned data URLs can be used with <img> element or embedded in text format like JSON.
For example, the following code creates a JPEG with quality 95 and displays the image in <img> element:
const img = new Image();
img.src = canvas.toDataURL('image/jpeg', 0.95);
document.appendChild(img);
We can also use toBlob to create the image file as binary instead of string.
This is useful for example when uploading the image to a server:
function uploadImage(blob) {
  const data = new FormData();
  data.append('username', 'pekka85');
  data.append('avatar', blob);

  fetch('/api/upload', {
    method: 'POST',
    body: data
  });
}
canvas.toBlob(uploadImage, 'image/jpeg', 0.95);
Grayscale demo
Let's put together a demo using functions and techniques introduced in this article. We'll load an image, turn it black-and-white and display the result:
loadImageFromUrl('example.jpg')
  .then(image => {
    const input = srgbToLinear(image);
    for (let i = 0; i < image.data.length; i += 4) {
      const r = input.data[i + 0];
      const g = input.data[i + 1];
      const b = input.data[i + 2];
      const y = 0.2126 * r + 0.7152 * g + 0.0722 * b;
      input.data[i + 0] = input.data[i + 1] = input.data[i + 2] = y;
    }
    const output = linearToSrgb(input);

    const canvas = document.createElement('canvas');
    canvas.width = output.width;
    canvas.height = output.height;
    const ctx = canvas.getContext('2d');
    ctx.putImageData(output, 0, 0);
    document.body.appendChild(canvas);
  });
Details of the conversion formula can be found on Wikipedia's Grayscale article. Full source code of the demo is available by viewing frame source or browsing it here.
Conclusion
Now you should know the basics required to implement different image processing algorithms in the browser. If you need ideas, just think of all the tools, filters and effects an image editor like GIMP provides.
There are many things not covered in this article. For example, it's probably a good idea to offload the image processing to a worker in order to keep the user interface responsive. It's also worth studying WebGL and GLSL shaders especially if you're planning on handling large images or doing real-time image processing.